Advanced View Options Panel
The Advanced View Options Panel is located in the Right Sidebar of the Foxel workspace. This panel allows you to customize the rendering settings for the default camera, which is the main camera used for working on your scenes.
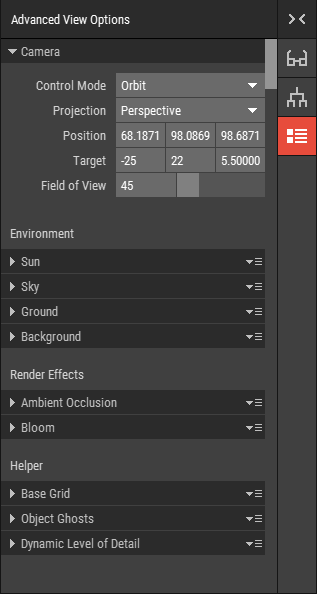 🔺 Figure 1: The Advanced View Options Panel
In contrast, custom cameras are utilized primarily for rendering to file, and their settings are edited in the Inspector, allowing for specific perspectives and configurations tailored to your final output. For more information, see Setting Up Cameras.
Available Settings
Default Camera
- Control Mode: Choose between Orbit or First Person control modes to navigate your scene.
- Projection: Select either Perspective or Orthographic projection to determine how your scene is rendered.
- Position: Set the position of the camera in the 3D space.
- Target: This option is available only in Orbit mode, allowing you to define the point the camera orbits around.
- Yaw, Pitch: These settings are available only in First Person mode, allowing you to adjust the camera's orientation.
- Field of View: Adjust the field of view to control how much of the scene is visible through the camera.
Sun
- Azimuth: This property determines the horizontal angle of the Sun in the sky. Adjusting the azimuth changes the direction from which the sunlight is coming, affecting the shadows and highlights in your scene.
- Elevation: The elevation controls the vertical angle of the Sun. A higher elevation simulates midday sunlight, while a lower elevation can create longer shadows, mimicking early morning or late afternoon light.
- Color: You can customize the color of the Sun to achieve different lighting effects. Warmer colors can create a sunset effect, while cooler colors can simulate a midday sun.
- Disk Visible: This option allows you to display the Sun as a visible disk in your scene. Enabling this feature can enhance the realism of your renders, especially when combined with atmospheric effects.
- Disk Size: Adjust the size of the Sun's disk when the "Show Disk" option is enabled. A larger disk can create a more pronounced visual effect in your scene.
- Intensity: The intensity setting controls the brightness of the Sun. Increasing the intensity will result in brighter lighting and more pronounced shadows, while decreasing it will soften the overall illumination.
Pleae note that the Sun is always turned on for the default camera. Shadow casting of the Sun can be enabled via the View Options Bar.
Sky
You can choose from three different modes: Uniform Lighting, Image-Based Lighting, and Atmospheric Scattering. Each mode offers unique properties that can significantly impact the look and feel of your renders
Uniform Lighting
Uniform lighting provides a consistent light source across the entire scene, ideal for achieving a flat and even illumination.
- Color: Set the color of the uniform light. This will affect the overall hue of your scene, allowing you to create different moods.
- Intensity: Adjust the intensity of the uniform light. Higher intensity will result in brighter lighting, while lower intensity will create a softer effect.
Image-Based Lighting
Image-based lighting uses a cubemap to create realistic lighting effects based on an environment image.
- Cubemap: Select an environment cubemap to use as the light source. This will provide dynamic lighting that reflects the colors and details of the selected image.
- Intensity: Control the brightness of the image-based lighting. Adjusting this setting will influence how strongly the cubemap affects the scene.
- Blur: Apply a blur effect to the rendered environment map in the background. This blurring does not affect the lighting itself but softens the appearance of the environment, creating a more diffused background.
- Angle: Rotate the cubemap around the Y-axis to change the direction of the light. This allows you to adjust the lighting based on the desired perspective.
Atmospheric Scattering
Atmospheric scattering simulates the scattering of light in the atmosphere, creating realistic sky effects.
- Rayleigh Color: Set the color of Rayleigh scattering, which affects the blue hues of the sky. This is particularly important for simulating clear skies.
- Rayleigh Density: Adjust the density of Rayleigh scattering to control how much light is scattered in the atmosphere. Higher density will result in a more vibrant sky.
- Mie Color: Define the color of Mie scattering, which affects the appearance of clouds and haze in the atmosphere.
- Mie Density: Control the density of Mie scattering to influence the visibility of atmospheric effects. Higher density can create a more pronounced haze.
- Ozone Color: Set the color of ozone scattering, which can add depth to the atmosphere and affect the overall color balance.
- Ozone Density: Adjust the density of ozone scattering to simulate different atmospheric conditions.
- Phase: Control the phase function, which affects the scattering behavior of light in the atmosphere. This can be used to simulate various atmospheric effects.
- Intensity: Adjust the overall intensity of the atmospheric scattering effect. This will influence how pronounced the scattering appears in your scene.
Ground
- Color: Set the color of the ground plane.
- Horizon: Adjust the horizon line to control the visibility of the ground in relation to the sky.
Please note that the visibility of the ground plane is managed through the View Options Bar.
Background
- Color: Set the color of the background.
Please note that the visibility of the background is managed through the View Options Bar. If the background is set to visible, it will display the selected color. If it is not visible, the sky will be rendered instead.
Ambient Occlusion
- Radius: Set the radius for ambient occlusion effects, which enhances the depth perception of objects in your scene.
- Intensity: Control the intensity of the ambient occlusion effect to achieve the desired level of shading.
Please note that ambient occlusion can be enabled through the View Options Bar.
Bloom
- Intensity: Adjust the intensity of the bloom effect, which creates a glow around bright areas in your scene.
- Threshold: Set the threshold for the bloom effect to determine which areas of the scene will be affected.
Please note that bloom can be enabled through the View Options Bar.
Base Grid
- Gridline Spacing: Specify the spacing for gridlines in the scene view to assist with alignment and positioning.
- Color: Choose the color of the gridlines for better visibility against your scene.
Please note that the visibility of the base grid is managed through the View Options Bar.
Object Ghosts
Object ghosts are rendered behind isolated objects, providing a visual reference for framing and isolating objects in your scene.
- Opacity: Adjust the opacity of the object ghosts to control their visibility.
Please note that the display of object ghosts can be enabled through the View Options Bar.
Dynamic Level of Detail
Dynamic LOD settings allow you to manage the level of detail for objects based on their distance from the camera.
- LOD 1 Distance: Define the distance at which the second level of detail is applied.
- LOD 2 Distance: Specify the distance for the third level of detail.
- LOD 3 Distance: Set the distance for the fourth level of detail.