Translating 3D Objects
You can move 3D objects in Foxel in three ways:
- in the Inspector
- with the Translate dialog
- with the Move Tool
Translating in the Inspector
You can edit position values directly in the Inspector.
Position values are defined in the object's local space, relative to its parent in the hierarchy.
If multiple objects are selected, changing the position in the Inspector applies the same position values to all selected objects.
Translating with the Dialog
To move objects with the dialog:
- Select the object or objects you want to move.
- Choose Object > Transform > Translate.
- Enter the translation settings.
- Click OK.
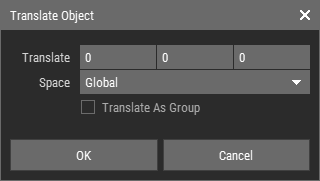 🔺 Figure 1: Translate dialog.
Translate Dialog Options
| Offset | Defines the movement offset along the X, Y, and Z axes. |
| Space | Defines whether the offset is applied in local space or world space. |
| Translate as Group | Moves the selection together instead of moving each object independently. |
Space Options
- Local: Moves objects along their local axes.
- World: Moves objects along the global axes.
If Translate as Group is enabled, the translation uses world space.
Translating with the Move Tool
The Move Tool provides an interactive way to move objects directly in the scene.
- Activate the Move Tool.
- Select the object or objects you want to move.
- Drag a gizmo handle to move the selection.
TIP
If voxels are currently selected, the Move Tool moves the selected voxels instead of the object. Deselect the voxels if you want to move the object itself. For more information, see Translating Voxel Grids.
Move Gizmo
The Move Tool uses a gizmo with several handle types:
- 3 arrows for movement along a single axis
- 3 squares for movement inside a plane
- 1 center cube for free translation
This lets you constrain movement when needed or move the object freely.
Snapping While Moving
You can snap positions while using the Move Tool.
- Hold
Shiftwhile dragging. - Move the cursor to a snap point.
- Release the mouse button.
While Shift is held, available snap points are highlighted in yellow.
Move Tool Options
Before moving, you can set these options in the Toolbar:
- Transform Space
- Pivot Mode
- Round Position
- Snap Mode
Transform Space
The Transform Space toggle switches between:
- Global: The gizmo is aligned to the global axes.
- Local: The gizmo is aligned to the object's local axes.
Pivot Mode
The Pivot Mode toggle switches between:
- Object Center: Uses the object's center as the transform pivot.
- Custom Pivot: Uses the custom pivot set in the Inspector.
Round Position
When Round Position is enabled, Foxel rounds the object's position values after you release the mouse button.
This is useful when you want clean integer-like position values after interactive movement.
Snap Modes
- Snap to Bounding Box: Uses bounding-box corners as snap points.
- Snap to Base Grid: Uses grid intersections as snap points.