Editing Mini Sets
Mini Sets and Minis are managed on the Minis page of the workspace.
There, you can browse available Mini Sets, open a set, and manage the Minis it contains.
For an overview of workspace pages, see Pages.
Opening the Mini Editor
You can open the Mini Editor in several ways:
- Double-click a Mini Set on the left side of the Minis page.
- Select a Mini Set, then click the Edit button below the Mini list on the right side.
- Double-click a Mini on the right side.
The Mini Editor opens in a separate window.
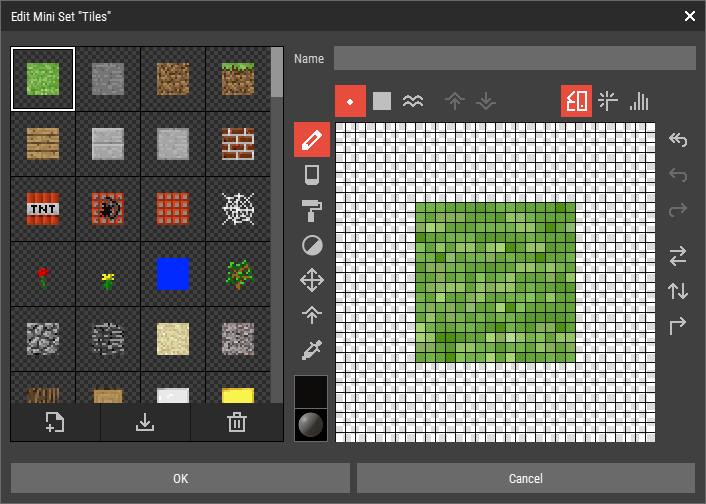 🔺 Figure 1 The Mini Editor.
Managing Minis
Inside the Mini Editor, the Minis of the current Mini Set are shown on the left side.
There you can:
- Activate a Mini by clicking it.
- Select multiple Minis using
CtrlorShift. - Create a new Mini.
- Delete selected Minis.
- Import Minis. For more information, see Importing Minis.
- Reorder Minis by dragging and dropping them.
- Organize Minis to remove gaps.
- Export selected Minis. For more information, see Exporting Minis.
Editing a Mini
The active Mini is edited in the main area of the Mini Editor.
The Mini Editor is similar to the Heightmap Editor, but adapted for Mini data. You use tools to edit the Mini's pixels, colors, materials, and heights.
Differences from the Heightmap Editor
The Mini Editor differs from the Heightmap Editor in a few important ways:
- Pixel selection is not available.
- Height editing uses a dedicated Height Tool.
- The Move Tool shifts the entire Mini at once. Pixels that move out on one side wrap around to the opposite side.
Channels
Because Minis are edited in 2D, the Mini Editor provides different display channels to inspect their data:
- Color shows the Mini's colors.
- Material shows the assigned materials.
- Height shows height values in grayscale.
You can switch the channel in the upper-right area of the editor.
Editor Operations
The Mini Editor also provides several utility operations:
- Raise and Lower height values with the Height Tool.
- Flatten the Mini to remove height variation.
- Flip Horizontally or Flip Vertically.
- Rotate the Mini by 90 degrees.
- Undo, Redo, and Revert changes.
Note
The undo history is reset when you switch to a different Mini.